Previous: Using Aqemu for Virtualization
Networking QEMU Virtual BSD Systems
QEMU has several different modes of networking. We will discuss two:
1 User Mode Networking – In this mode, the QEMU virtual machine automatically starts up an internal DHCP server on an internal networkaddress -10.0.2.2/24. This is internal to the guest environment and is not visible from the host environment. If the guest OS is set up for DHCP, the guest will get an IP address from this internal DHCP server. The QEMU virtual machine will also gateway packets onto the host network through 127.0.0.1. In this way, QEMU can provide an automatic network environment for the QEMU user without any manual configuration. This configuration is shown in Illustration 26.
Illustration 26: - QEMU 'User Mode' Networking with Internal DHCP Server
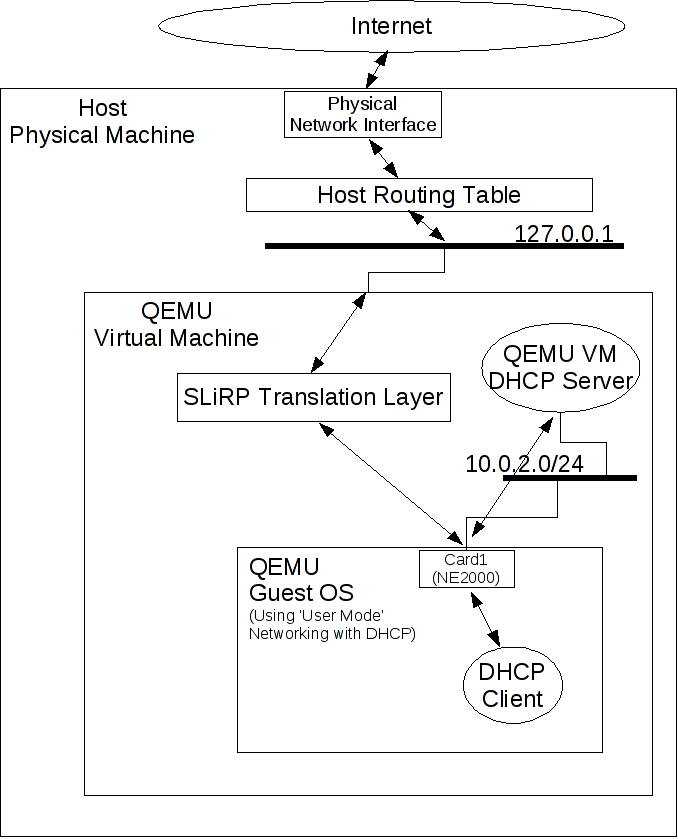
2 TUN/TAP Network Interface – In this mode, the QEMU Virtual Machine opens a pre-allocated TUN or TAP device on the host and uses that interface to transfer data to the guest OS. This method involves the standard manual configuration of the guest OS interface using the ifconfig command. This method doesn't involve the DHCP server. However, note that the server is still running, it's just not used by an interface using this method.
With the TUN/TAP network interface method, the host system is responsible for configuring those interfaces before QEMU is started, as described in the next section.
Bottom line- if you want simplicity, use the “User Mode Networking” method and use DHCP in the guest OS. If you want strict control of your IP addressing and routing, use the “TUN/TAP Network Interface” method.
We'll skip “User Mode Networking” and just concentrate on manual configuration using the “TUN/TAP Network Interface”.
Using Manual Network Configuration
To start experimenting with manual configuration, we'll create a simple network, using one virtual bridge on the host system. All the virtual machines will be attached to the virtual bridge, and in the same vlan (default vlan 0).
Illustration 27 shows the target network design.
Illustration 27: Simple Network Design for Five BSD Virtual Machines
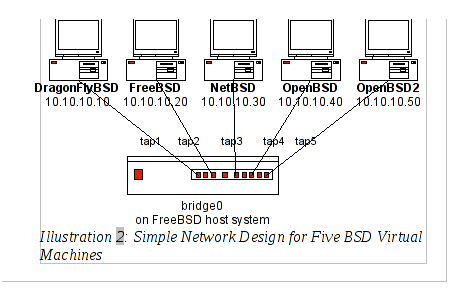
As noted above, each virtual machine (VM) was originally created with a single network device, using the default “User Mode Network Stack” option on AQEMU (and QEMU). To connect the VMs together using manual configuration, the network devices for each VM have to be modified to use the “TUN/TAP Network Interface” method.
The bridge itself is created on the host FreeBSD system using the network bridge device if_bridge(4). For our purposes, we will only use the bridge device for connecting VMs together, and will not use any packet filtering capabilities of the bridge framework.
We'll discuss the host setup first, then concentrate on the VM setup later.
Host Setup
To begin, the host system needs the aio(4) kernel loadable module:
# kldload aio
As noted above, host will use the if__bridge(4) interface for connecting all VMs. The if__bridge(4) is a cloneable interface and can be created with the ifconfig(8) “create” command, or through the clone interface variable in rc.conf(5). The bridge interface software itself is a loadable kernel module and must be loaded prior to creating the bridge interface:
# kldload if_bridge
The module can also be loaded at boot time. You can check the status of the module with the kldstat command.
Loading the kernel module does not actually create the bridge interface. To create it, use:
# ifconfig bridge0 create
Check the interface with:
# ifconfig bridge0
The bridge0 interface is now created, but not yet configured for any connections. The ifconfig(8) manual page lists the addm (add member) and deletem (delete member) parameters for bridge configuration. However, to add members to the bridge, we first have to create them.
The bridge members are tap(4) interfaces that form the link between the host system and the virtual machines. Like bridges, tap(4) interfaces are clonable devices that are enabled by means of a loadable kernel module:
# kldload if_tap
and are created the same as bridge devices:
# kldload if_tap
# ifconfig tap0
# ifconfig tap1 create
# ifconfig tap1
We can now add the taps to the bridge. With just one bridge, there is no need to take precautions against Spanning Tree loops. Therefore, our parameters for adding tap devices to the bridge are quite simple:
# ifconfig bridge0 addm tap0 addm tap1
# ifconfig -a
Before using the tap devices in QEMU, two sysctls require adjustment:
# sysctl net.link.tap.user_open=1
This sysctl permits any user program (recall that QEMU is a user program) to open the tap device.
# sysctl net.link.tap.up__on__open=1
This sysctl marks the interface as UP once the user program has opened the tap device.
Since the eventual goal here is to get all five BSD systems communicating, we'll create more interfaces:
# ifconfig tap2 create
# ifconfig tap3 create
# ifconfig tap4 create
# ifconfig tap5 create
and add them to the bridge:
# ifconfig bridge0 addm tap2 addm tap3 addm tap4 addm tap5
There is one last command needed to make sure it all works. Sharp-eyed readers will notice that the bridge was not marked UP when it was originally created above. This command marks the bridge as UP and able to receive packets from the tap interfaces:
# ifconfig bridge0 up
We are now ready to consider the guest VM system configurations.
Guest Virtual Machine Configurations
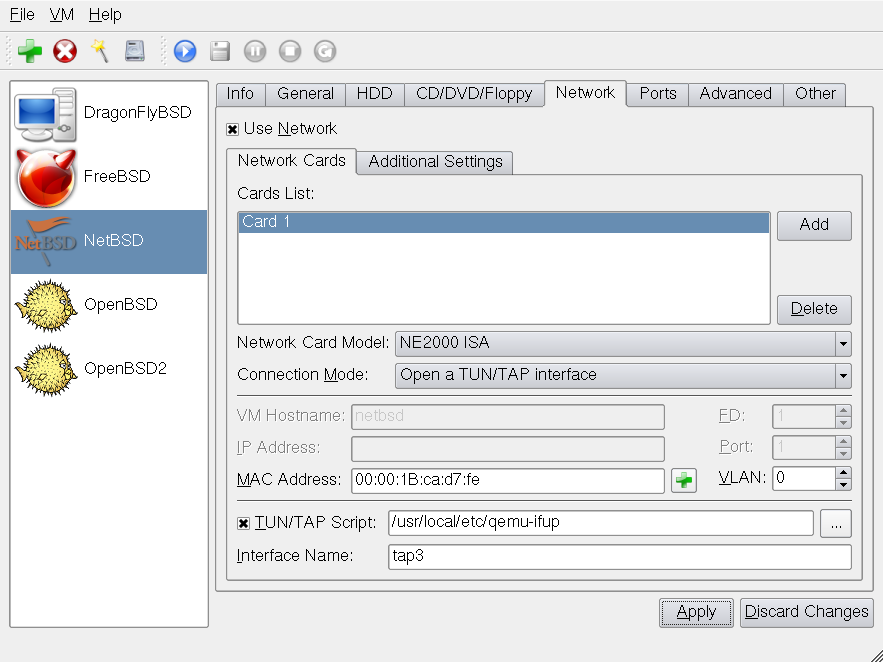
As discussed above, we need to change the virtual machine network interface connection mode to allow it to use the TUN/TAP interface. Illustration 28 shows the modifications for the DragonFly BSD system network interface.
Illustration 28: QEMU Network Connection Parameters for DragonFlyBSD VM
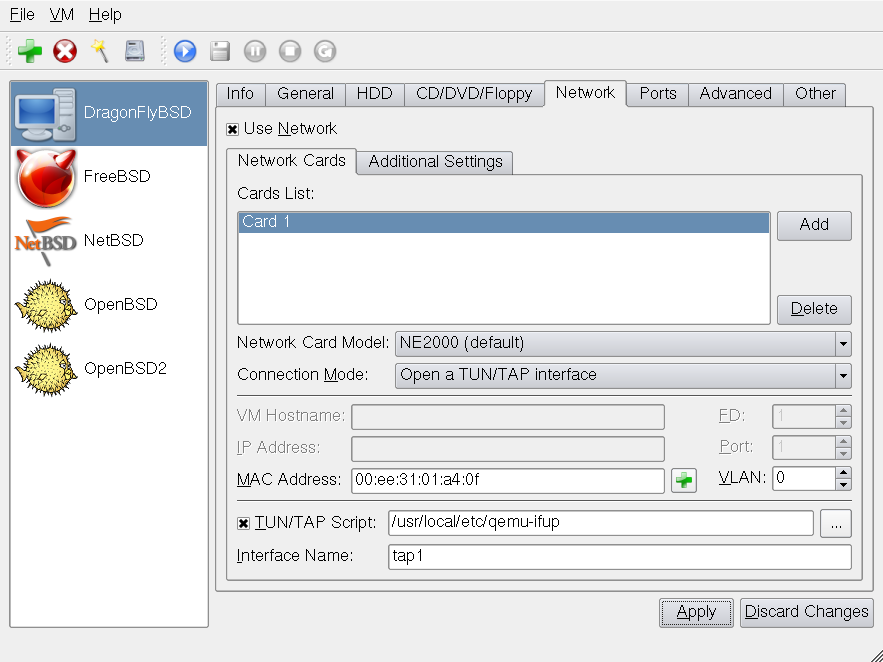
Select the “Open a TUN/TAP Interface” option from the Connection Mode dropdown menu. Check the TUN/TAP Script and Interface Name are set to the values dispalyed. The Interface Name entry is the name of the host system tap device that this BSD system will use. The other BSD systems are configured similarly.
Illustration 29: QEMU Network Connection Parameters for FreeBSD VM
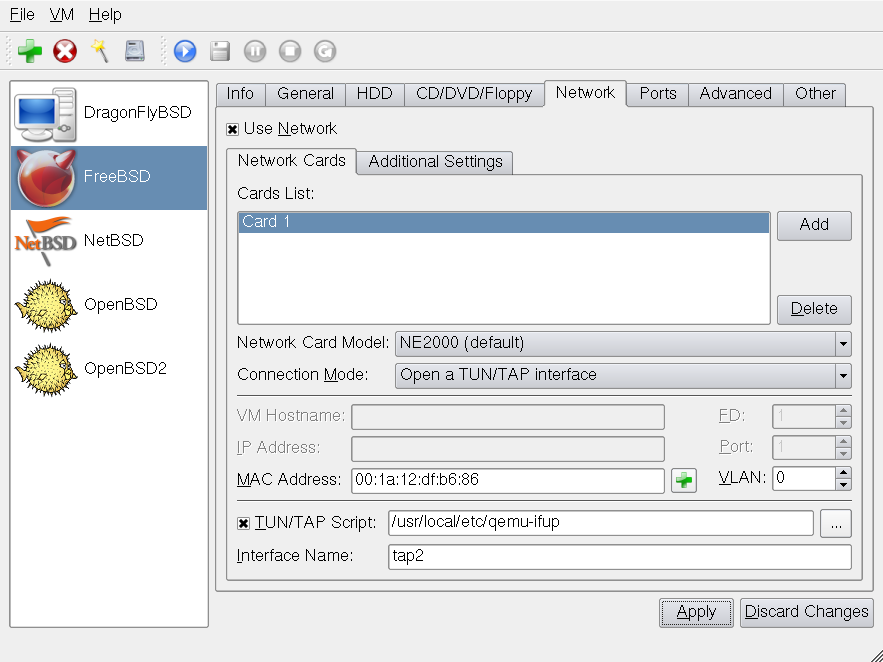
Illustration 30: QEMU Network Connection Parameters for NetBSD VM
Note that the NetBSD Network Card Model is listed as the NE2000 ISA instead of the default NE2000. Additional discussion of NetBSD configuration is below.
Illustration 31: QEMU Network Connection Parameters for OpenBSD VM
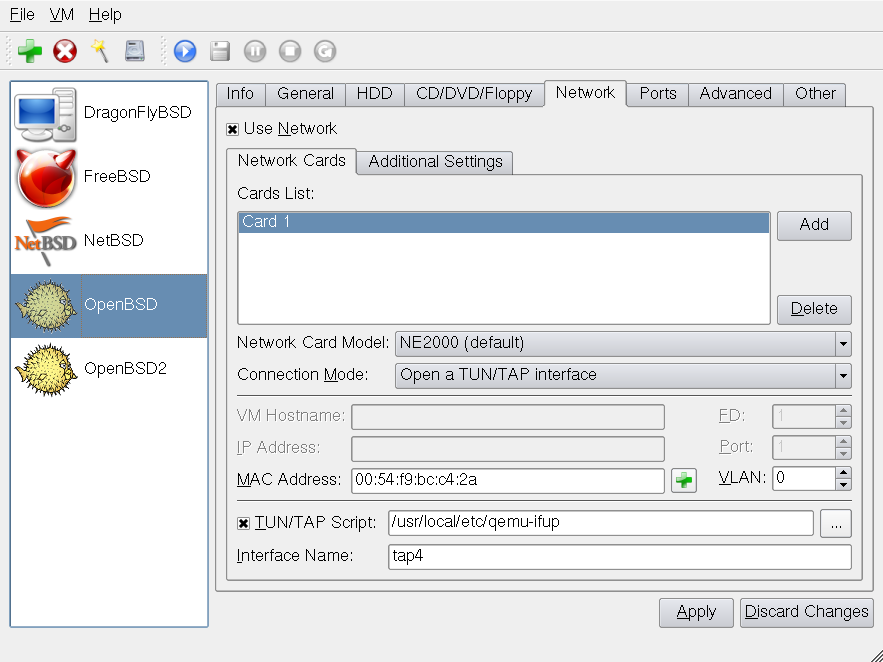
The OpenBSD2 system is identical with the exception of the Interface Name of tap5.
The OpenBSD ne interface may have an issue with QEMU. If you have trouble with networking under QEMU, try the following workaround:
  config -ef /bsd
  disable mpbios
  quit
and reboot the virtual machine. The network should work correctly now.
All the above systems have a TUN/TAP script identified as /usr/local/etc/qemu-ifup. This script is simple:
#!/bin/sh

/sbin/ifconfig ${1} up
It's purpose is to bring up the TAP interface when the VM is booted.
Initial Startup
For our simple network, let's use the following IP addressing scheme:
System (IP address and mask)
DragonFly BSD (10.10.10.10 255.255.255.0)
FreeBSD (10.10.10.20 255.255.255.0)
NetBSD (10.10.10.30 255.255.255.0)
OpenBSD (10.10.10.40 255.255.255.0)
OpenBSD2 (10.10.10.50 255.255.255.0)
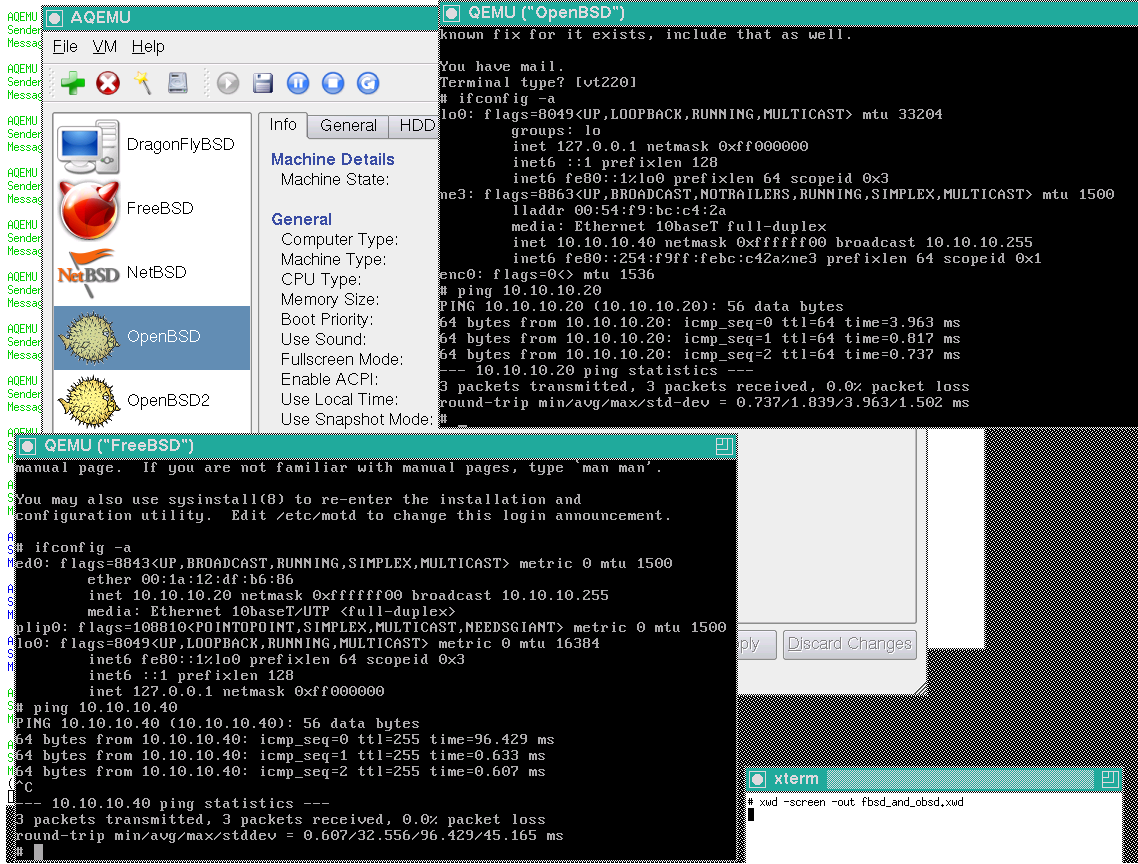
For the initial startup, bring up the FreeBSD VM and the OpenBSD VM and configure their network interfaces as shown above. You should be able to ping in both directions as shown in Illustration 32:
Illustration 32: FreeBSD and OpenBSD QEMU VMs Networked Together
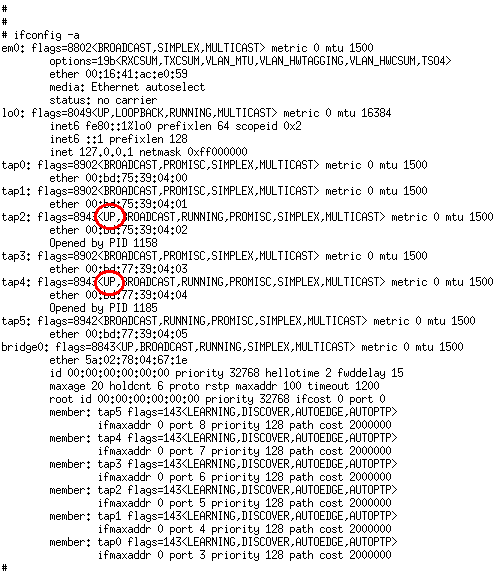
If you step back to the host system and examine the interface list, you should see tap2 and tap4 are marked as UP, the rest are not yet opened as shown in Illustration 33.
Illustration 33: FreeBSD VM and OpenBSD VM TAP Interfaces As Seen From the FreeBSD Host System
NetBSD Configuration Considerations
You may find that the NetBSD configuration doesn't work correctly with the default NE2000 card. This seems to be due to an ACPI interface and network card interface conflict with QEMU. Advice on the Internet to solve this problem by turning off ACPI does not solve this problem for our purposes. ACPI on NetBSD should remain enabled.
For the most recent NetBSD releases, you can interrupt the boot sequence and select Option 4: Disable ACPI and SMP. This resolves the network problem with these versions of NetBSD.
For older versions, you may have success with the following special procedure:
1 Select the Network Card Model NE2000 ISA (instead of the default NE2000)
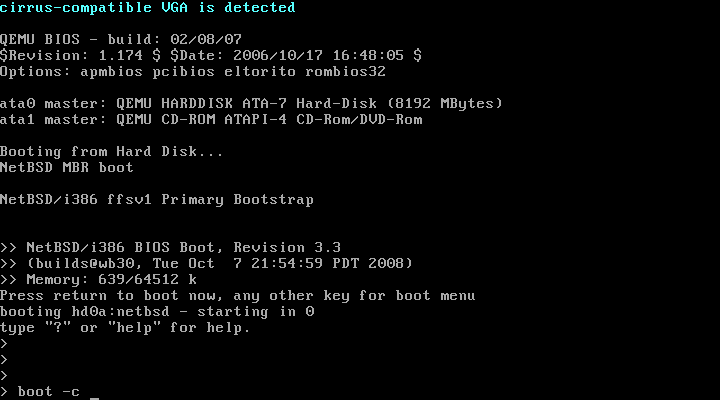
2 Interrupt the boot sequence before the NetBSD VM starts to boot. This is tricky since there is very little delay on startup. You may have to hit the AQEMU restart button, then quickly switch to the NetBSD VM window and hit the space bar. If you are successfull you'll be at the boot prompt where you can enter the boot -c option to enter NetBSD's “User Configuration Mode”. The boot prompt is shown in Illustration 34.
Illustration 34: Interrupting the NetBSD Boot Sequence to Specify a Custom Boot Option
3 This brings up “User Configuration Mode”- a special mode allowing configuration of devices prior to booting:
Illustration 35: NetBSD User Configuration of ne1 Network Interface
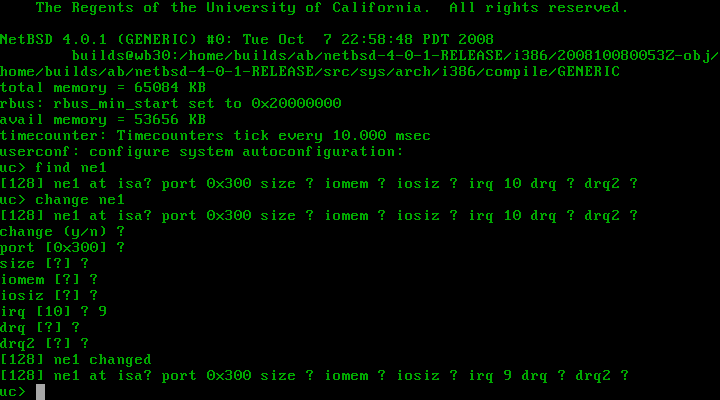
4 To configure the ne1 network interface (ISA card), first use the find ne1 command to search the kernel device table for all instances of the ne1 network device. The system lists the device and all parameters.
5 Then use the change ne1 command to begin changing each listed parameter. In the system listed above, only the irq (interrupt request) value had to be changed. Interrupt 9 was unused in the system so that value was chosen. The remaining values were unchanged. Type exit to exit User Configuration Mode and boot NetBSD. The device worked properly after this change.
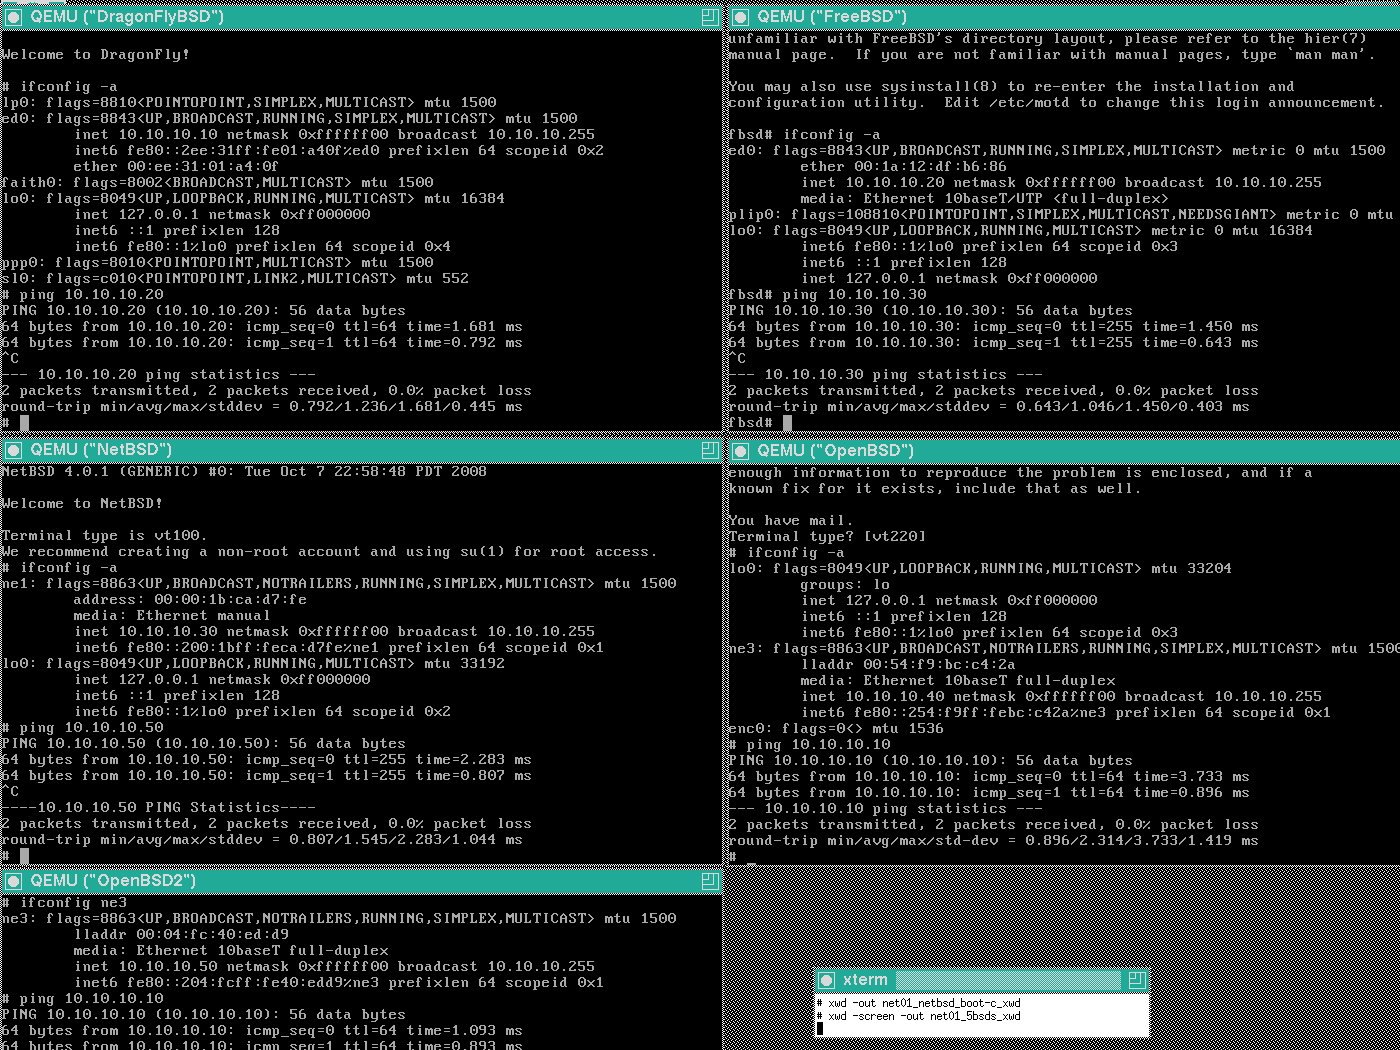
Illustration 36 shows all five BSD systems up and running with each system able to ping another system:
Illustration 36: Five QEMU Virtual BSD Systems Networked Together
We have now completed the configuration of the simple network in Illustration 27.